Thursday, October 11, 2012
A thought to ponder...
Would a really loud boom boom box have any affect on a running engine; i.e. disrupt the functioning components?
Things I've learned this week...
Let's see, I've learned how to adjust intake/exhaust valves; the proper way to hold a micrometer; what keeps bearing halves in place; the meaning of crush; and the difference between a turbocharger and a supercharger.
The bearing crush (when you torque the case halves together) is what keeps the bearings in place when running.
Crush- the outward force created by the portion of the bearing that extends above the housing bore when the bearing halves are set into place.
Turbochargers VS Superchargers-
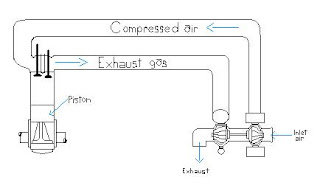
Basic Turbocharged engine diagram (courtesy of Kellom)
The bearing crush (when you torque the case halves together) is what keeps the bearings in place when running.
Crush- the outward force created by the portion of the bearing that extends above the housing bore when the bearing halves are set into place.
Turbochargers VS Superchargers-
- Turbochargers are powered by spent exhaust gases, which are used to spin a paddle-wheel-like part called an impeller. The impeller is connected on a shaft to the turbine, which has vanes on it to compress the incoming air, thereby creating boost, or pressurized induction.A wastegate is built into the system to prevent over-pressurization by venting the exhaust gases away from the impeller. Usually, the turbocharger will be lubricated by pressurized oil-- critically important as the impeller/turbine assembly can spin at speeds in excess of 100,000 RPM.
Basic Turbocharged engine diagram (courtesy of Kellom)

- A supercharger, in contrast, is driven by an accessory belt-- much like the alternator, air conditioner compressor, and water pump. Internally, there are two (sometimes three) lobes that rotate, sucking in air and force-feeding it to the engine. The supercharger makes a very distinctive noise, which can be music to the ears of performance enthusiasts. (Note: a parasitic draw.) (Info courtesy of www.FordsChevy.com)
Thursday, September 27, 2012
Blog Catch Up...
Day 1 of SPR QTR, I enjoyed listening to how everyone's SUM internships went, though I was surprised to hear that not many students knew about how wide our field spreads. When I was on the waiting list for this program, I was told of the many possibilities (which indeed is huge), which didn't surprise me much; but then again, I'm quite fascinated with how the world works and so ask lots of questions about many things.

Note to Don: this is a very simple diagram, anyone can make this. : p
I haven't taken a pic of the relay tester yet, but will do so shortly and post later; that was rather fun to make, must make one for my tool box. : )
On to the light boards... Good grief, at first I felt I was behind everyone else because for the life of me I couldn't figure out how to read the schematics. After a full day (and a partial morning) THE light bulb came on and I started understanding and I really got into it. There was a lot of confusion about wire 31 coming from the headlamp switch and wire 33A; whether they were PWR all the time or SWT PWR. Even Jeff was stumped, lol. Thank you Tracy for informing me that, for the most part, I was correct on figuring out which is which (they're both SWT PWR.) That made my day, knowing that I wasn't as far behind as the rest of you as I thought I was.
My link to "How A DC Motor Works" that helped me understand, well, how it works. Apparently the video that I viewed is currently unavailable... On to another one... http://www.youtube.com/watch?v=RAc1RYilugI I'm sorry if it's long and boring to you.
More notes to self:
Day 2 I found out the difference between a solenoid and relay; Solenoid- a mechanical connection. Relay-an electrical connection (magnetic switch).

Note to Don: this is a very simple diagram, anyone can make this. : p
- Slots 85 & 86, either could be used as PWR and the other as GRND.
- Coil to 85/86 gets charged with electrons and magnetizes which pulls arm and so switches connection from 87a to 87.
- Spike Deppression Device- Resistor allows spike to be consumed; allows spike to go one way and not the other.
- 12v @ 30 and 87
Note to self- continuity test is used to tell if there is an open circuit or not.
I haven't taken a pic of the relay tester yet, but will do so shortly and post later; that was rather fun to make, must make one for my tool box. : )
On to the light boards... Good grief, at first I felt I was behind everyone else because for the life of me I couldn't figure out how to read the schematics. After a full day (and a partial morning) THE light bulb came on and I started understanding and I really got into it. There was a lot of confusion about wire 31 coming from the headlamp switch and wire 33A; whether they were PWR all the time or SWT PWR. Even Jeff was stumped, lol. Thank you Tracy for informing me that, for the most part, I was correct on figuring out which is which (they're both SWT PWR.) That made my day, knowing that I wasn't as far behind as the rest of you as I thought I was.
My link to "How A DC Motor Works" that helped me understand, well, how it works. Apparently the video that I viewed is currently unavailable... On to another one... http://www.youtube.com/watch?v=RAc1RYilugI I'm sorry if it's long and boring to you.
More notes to self:
- No current load, no voltage drop.
- LED use very low current.
- 12v across fuse, fuse is blown.
- With any good fuse, there should be a slight Vd with load.
Tuesday, July 10, 2012
News from Stanwood
First day of my intern at Stanwood/Camano Island School District was exciting to me (regardless of how corny it may sound); I learned the proper way of removing/replacing a wheel by myself with the aid of a wheel bar. I removed two sets of driving wheels in less than 10 mins. YAY!!! I was so stoked I had to blab about it to many people. Hee hee hee
Since then, I've repaired many seats by either sewing or patch putty; a few lof's on vans and cars (no buses yet); tranny service on a dodge car; removed a transmission on a bus (that was fun); replaced bearings for timing belts; repaired bus floor using cement glue (very aggravating because the floor didn't want to stay down, and guess why, because my coworker didn't want to follow the instructions; blah); attempted to fix a 1950's Pfaff sewing machine (dumby me, found out later on that the needle was too short *snickers*); and used bus lifts for the first time (that was scary); and all this in the first week.
My second week wasn't very eventful giving that I only worked 2 days and the second day I left early because I was sick. In those 2 days, I reassembled the transmission and came across a problem. When replacing the bolts on the flex plate, one of the heads got sheared off. YIKES!! I had suggested using a tap and die set, in which I got the response of no, we would "walk" the bolt out instead, duh. I had forgotten about that technique.
As for this week, so far I've done (you've probably guessed it) MORE SEAT REPAIRS; timing belts; removed some brakes; and wheel swaps. Ooo ooo ooo.... for the grande finale of the day... wait for it... wait... I GOT TO DRIVE 3 BUSES FOR THE FIRST TIME!!!!!!!!! OMG! What an adrenaline rush! I was scared S@*!less when I was told I was to do that. AAAAHHHHHHH!!! But I did wonderful. No accidents for this lady. Sweet!!
Total hrs to date: 72
CHEERS!
P.S.
I'll try to remember to keep my phone on me so that I may take pics to post. Sorry.
Monday, June 11, 2012
Heavy Duty Demand Creates A Scarcity Of Mechanics
An interesting article that was passed on to me that I thought you all might be interested in, albeit the article is from Canada.
http://www.journalofcommerce.com/article/id50483/--heavy-duty-demand-creates-a-scarcity-of-mechanics#.T9XwkSRqgLk.mailto
http://www.journalofcommerce.com/article/id50483/--heavy-duty-demand-creates-a-scarcity-of-mechanics#.T9XwkSRqgLk.mailto
Friday, May 25, 2012


Brakes


When first given this assignment, I was ready to dive right in. Until I got the wheel and brakes off then was told to remove the axle, YIKES!!! I've never removed an axle before and truthfully was afraid of unknown pieces falling out. Needless to say, nothing does and my spirits were lifted. Very educating and entertaining.
(Back right wheel of Kenworth. Waiting for other pictures I forgot to take, lost in all the excitment I was.)
Subscribe to:
Posts (Atom)